Tunnels. Why’d it have to be tunnels?
Americana Jones — while cycling
You just returned from your intrepid adventure;
whilst recovering your aching legs in your jaccuzi,
you take a deep whiff of the 1936 oak aged whisky
that you have reserved for such a special occasion.
You feel the tiredness seeping out of your body
and straight into the overflow drain pipes of the
jaccuzi bath. At peak relaxation you take out your
trusty smartphone, which never let you down in
time of hardship during your adventures, to take in
the details of your journey and feel the satisfaction of
a summarized closure. Opening up the newly installed
GPS tracking app, which you thought might be an upgrade to
what you previously used,… alas, the records are missing!!
A flood of anger towards the crashed app
and a hint of self-loathing washes over you.
“At least I have my photos…”, you somberly think to yourself.
Fear not brave adventurer! Those photos you have will save the day!
If you kept your smartphone GPS on while taking photos there is a good chance that the location of those photos are saved. If you took many photos along your journey then you have recorded many locations (and times) at which they were taken. It is then a simple notion to take all those photos and create a travel route from them. Lets begin!…
Prerequisites
- ExifTool (>11.78) — for extracting photo metadata; include in PATH
- Python 3 (3.6)
- numpy (>1.15.1)
- gpxpy (1.4.0) — library for manipulating GPX files in Python
Step 1: Extract GPS coordinates from photos
Use ExifTool to programmatically extract the GPS coordinates a photo. For example, running the command line:
exiftool -GPSLatitude -GPSLongitude -GPSAltitude -GPSDateTime -n "C:\image.jpeg"
Outputs the GPS latitude, longitude, altitude, and the datetime recorded in the metadata of the photo “image.jpeg”. The tag “-n” just shortens the output format. Automating this process across all photos in a directory can be done in Python using the check_output command of the subprocess module:
for filename in listdir(folderpath):
    filepath = folderpath + '\\' + filename
    GPS = check_output('exiftool -GPSLatitude -GPSLongitude -GPSAltitude -GPSDateTime -n "%s"' %filepath).decode()
    #Do something with GPS variable here...
Here the GPS variable stores the string generated from the check_output command that calls the ExifTool. The .decode() is necessary to convert from the bytes representation to Unicode string. Note that this string is empty if there is no GPS metadata!
In my script I split the GPS string using GPS.split('\r\n') and append each part to different explicitly named lists (see my GitHub for the full code). My lists are named: lats, lons, elevs, times.
Step 2: GPX file of photo routes
Now that we have the coordinates and times for all the photos we need to create the GPX file. First, import the gpxpy module and use the following code to make a track:
gpx = gpxpy.gpx.GPX()
gpx_track = gpxpy.gpx.GPXTrack() #GPX track
gpx.tracks.append(gpx_track)
gpx_segment = gpxpy.gpx.GPXTrackSegment() #Segment of GPX track
gpx_track.segments.append(gpx_segment)
The track then needs to be populated with points, which is the information we got from the photos. This can be done in a single line of code:
[gpx_segment.points.append(gpxpy.gpx.GPXTrackPoint(lat, lon, elevation=elev, time=time)) for lat,lon,elev,time in zip(lats,lons,elevs,times)]
Lastly, save this track as a .gpx file:
with open("Tracks_from_photos.gpx","w") as f:
    f.write(gpx.to_xml())
This GPX file can then be visualized as follows:
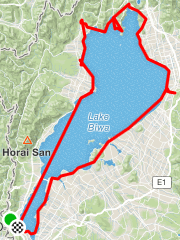
As you can see, you have a track consisting of points (or waypoints) but the lines drawn between them do not follow any roads (and some cross the sea). It may be more interesting to create routes that follow roads between the waypoints (like a route generated between two locations in Google maps).
Step 3: Use “GPX to Route”
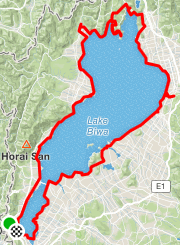
Here we have to rely on a third party to get the routing between the waypoints generated in our GPX file. Go to https://labs.strava.com/gpx-to-route/ and upload the GPX file (requires registration). The generated file is also a GPX file. Note, that Strava is the only service that I know of that can do it for free (no particular endorsement). Loading the GPX file in a viewer we get our final result:
Congratulations!
After your long and weary journey you have lost your precious
GPS data, nevertheless, at the edge of despair
a moment of inspiration – using your quick wit you whip out your trusty python and
with a swift jerk of the hand – a resonating thunderclap…
When the white smoke clears…
Lo’ and behold!
The Holy GPS route!
BONUS: GPX route with timestamps
Now we have a nice route that follows the road but there is one problem now: the timestamps are missing! This is vital information if you wish to see how fast you were going. It seems we have to manually specify the timestamps for each point in the route.
The Strava-generated GPX file does not contain timestamps but it contains way more point than our original file. So the problem here is to match the time from our original GPX file to the respective points in the Strava GPX file and linearly interpolate the time for the in-between points in the Strava GPX file. The way to match the respective points between the two GPX files is to use the latitude and longitude information. To get the Strava GPX file latitude and longitude:
gpx_file = open('Strava_gpx.gpx', 'r')
gpx = gpxpy.parse(gpx_file)
lats_strava, lons_strava = ([],[])
for track in gpx.tracks:
    for segment in track.segments:
        for point in segment.points:
            lats_strava.append(point.latitude)
            lons_strava.append(point.longitude)
The Strava generated file slightly shifts the waypoints to match the roads so the lat/lons will not be exact. Therefore, to match them, for a given point we need to use the nearest Euclidean distance (reasonable for small differences):
argmin(sqrt((lons_strava-lon)**2 + (lats_strava-lat)**2))
Here lons_strava and lats_strava are the longitude and latitude values in the Strava generated GPX file. The numpy function argmin is used to get the point, or keypoint, in the file that has the closest distance.
The above function is used for each latitude/longitude pair in the original GPX file to generate a list of indices. This list is then used to interpolate the timestamp as follows:
interp(arange(keypoints[i],keypoints[i+1]+1),keypoints,timestamp)
The list of keypoint indices is the variable keypoints. The timestamp from the original GPX file is given in the timestamp variable. The timestamp is interpolated between the keypoint indices (e.g. between index 16 and 159, inclusive). The i variable here is to iterate through the keypoints list. Note that the numpy function interp takes the 1st argument as the points at which to evaluate the interpolation.
The above is repeated for each keypoint by the variable i and the generated list is appended to itself. Lastly, the timestamps are appended to the track points and then written as a new GPX file:
for point,d in zip(gpx.tracks[0].segments[0].points,trk_date):
    point.time = d

with open("Strava_gpx_with_timestamp.gpx",'w') as f:
    f.write(gpx.to_xml())
OPTIONAL: Filter GPS data
It may be that for some of the photos the GPS accuracy was really bad and need to be removed. For this, a simple logic is employed: remove the GPS points where the speed required to traverse between two GPS points is above some threshold value.
#Requires the haversine package!
from haversine import haversine #The haversine formula determines the great-circle distance between two points on a sphere given their longitudes and latitudes.
arc_length = np.array([haversine((lats[i], lons[i]),(lats[i+1], lons[i+1])) for i in range(len(lats)-1)]) #Distance between 2 points in km
delta_t = np.array([(times[i+1]-times[i]).total_seconds()/3600 for i in range(len(lats)-1)]) #Time difference between points [hr]

#We have to treat the 1st point of the GPS data in a special way
arc_length = np.append(0.01, arc_length) #0.01 is just a small non-zero value used for the 1st data point
delta_t = np.append(1, delta_t) #Make the 1st point take 1 hour (arbitrarily chosen)

speed = arc/delta_t #Calculates the velocity [km/hr]
Now having calculated the speed between points: we keep only the points where the speed is less than 30 km/hour (this threshold can be changed depending on if walking or bicycling, etc…).
#filter by speed less than 30 km/hr and photos with no displacement
ind = np.array(speed<30) * np.array(arc>0) #Indices that satisfy the requirement (also filter points that did not move from previous point)
lats,lons,elevs,times = (np.array(lats)[ind],
                         np.array(lons)[ind],
                         np.array(elevs)[ind],
                         np.array(times)[ind])

Also my YouTube channel for AI related projects.
